Let's walk through the construction process of a fiberglass pool.
Fiberglass swimming pools are one-piece shells that can be dropped into your yard in a comparably short period of time—just 3 to 5 days in most cases. They are well suited to areas with cold weather seasons because the flexural strength of fiberglass prevents cracking during freezing-thawing cycles.
Fiberglass swimming pools come in a wide variety of shapes and colors and can include many options such as perimeter tile, inlaid tile, tile mosaics, Crystite® pool finishes, built-in water features like cascades and streams, fiber optic and LED lighting, vanishing edges, and in-floor cleaning systems.
So, can you expect the construction process to look like?
Step 1
Laying Out the Pool
With help from a dig sheet (a model of the pool with dig specifications), the installer will mark the placement of the pool in your yard. At this point you will need to make final decisions on any deck, patio, or landscape plans.
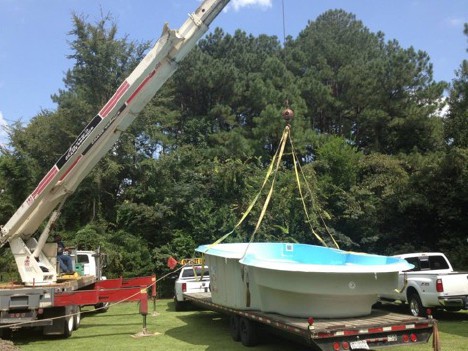
Step 2
Delivery
A fiberglass pool is delivered on a low loader tilt truck that is specifically designed to transport swimming pool shells. Parrot Bay Pools are delivered from Kentucky, Virginia, and Florida! Your pool filtration system, tools, equipment, and fittings are all provided by Parrot Bay Pools. Usually, your pool will arrive on the second day, although it varies from job to job.
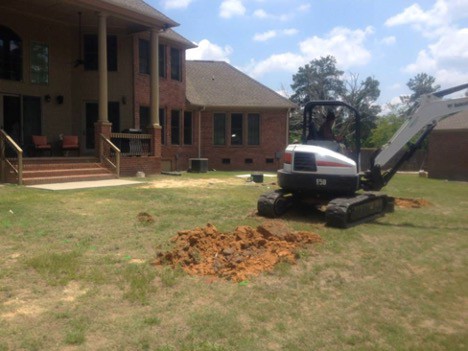
Step 3
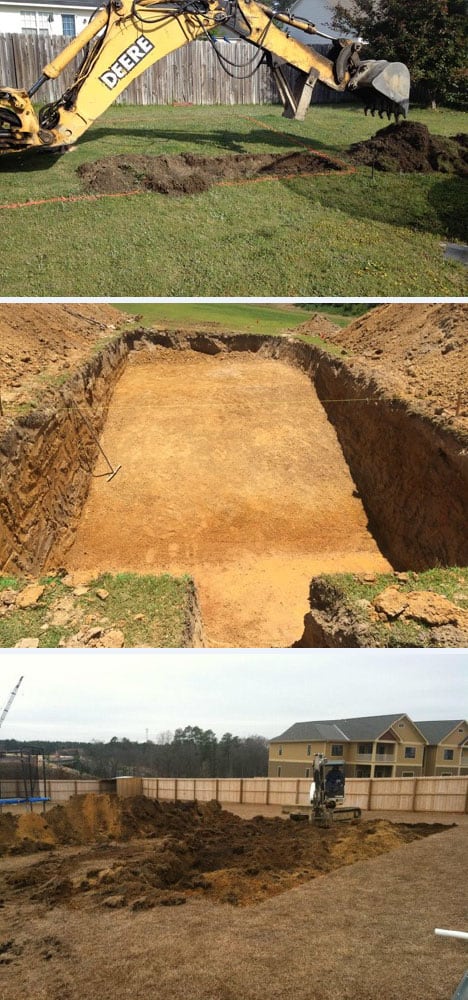
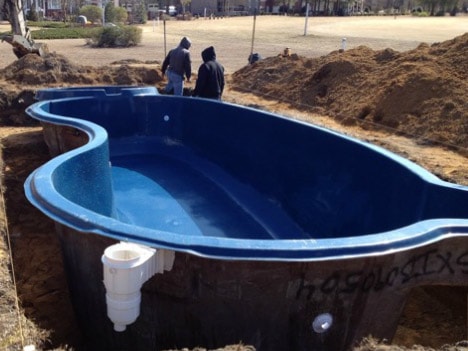
Excavation
Our Parrot Bay Pools and Spas delivery trucks will arrive towing a skid steer and our excavator. The skid steer will be used to move dirt and gravel, while the excavator will dig the hole.
Your pool will have the most accurate excavation possible because our excavator has a built-in GPS for digging. Once the pool's size and depth are determined, the excavator will start to dig. As one crew member digs the hole, the others will begin to set up the pump and filter system. The entire excavation process usually takes one day but may vary from job to job, depending on pool size or unforeseeable weather.
Common Excavation Obstacles
- Overdigging – Sometimes the person excavating will dig too deep. The most obvious solutions—that of placing soil back into the hole to raise the depth—is actually NOT a smart option. If soil is placed back into the hole, it will most likely settle over time causing the pool to shift, which could cause many other problems to occur. The only safe fix is to use gravel to raise the depth back up to the proper height. At Parrot Bay you don’t have to be concerned about overdigging. Our machine digs to exact specifications automatically every time.
- Unstable Soil or Organic Materials – Many times during digging our crew members will notice that the soil is not stable, or that there is organic material buried in the pool’s planned location. To prevent settlement, the soil or organic material must be removed regardless of the extra excavation required.
- Digging too Tight – An excavation hole should be approximately 1 foot larger than the outside of the pool shell and approximately 2 inches deeper than the pool depth. This will leave enough room to place gravel along the sides and under the steps, seats and/or ledges of the pool.
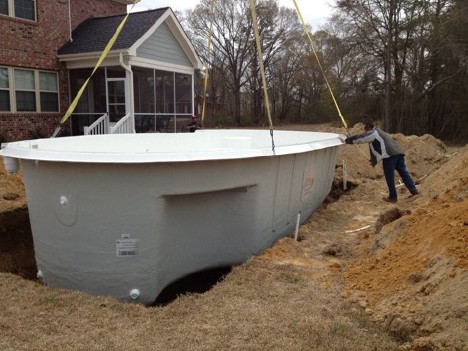
Step 4
Setting the Floor and Leveling the Pool
After excavation is complete, a layer of gravel is placed inside the hole where the pool floor will rest. A laser level determines exactly how much gravel should be used to achieve the correct height of the pool.
During the majority of our pool builds we use our excavator to lift your pool and place it in the hole. Occasionally we have to use a crane, such as when we need to lift a pool over a house, wall, or other structure.
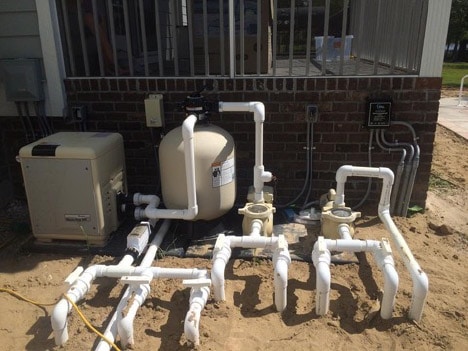
Step 5
Plumbing the Pool and Filter System
The filter is composed of two major components: the pool pump and the filter. The pump circulates the water, while the filter removes the debris and small particles from the water. Filter systems are typically located within thirty to sixty feet from the pool. Most pool owners prefer their filter system near their house somewhere inconspicuous.
Step 6
Backfilling the Pool Shell
Once the pool is placed in the hole and leveled, it is time to start filling the pool with water and backfilling around the outside with gravel. The water on the inside and the gravel on the outside must be brought up together to equalize the pressure.
Step 7
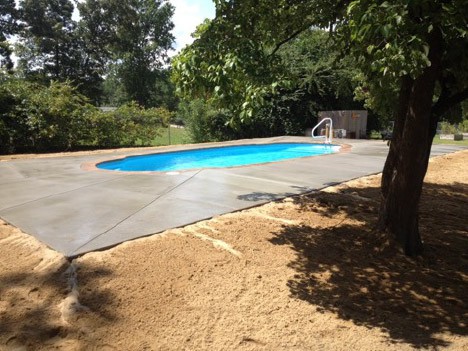
Coping and Decking
With the pool backfilled and electrical inspections approved, the pool is now ready for coping to be installed around the top of the pool shell. For fiberglass pools, standard concrete coping is common. However, other materials such as pavers, travertine, stones and brick may be used depending on the homeowner’s preference.
Step 8
Pool Fence
Within 30 days of completion a 4ft tall fence is required around the pool. In North Carolina your fence is also required to have a self-closing gate that swings out away from the pool and self-latches. Once the fence is installed the homeowner must contact their county for a final inspection.

Step 1
Laying Out the Pool
With help from a dig sheet (a model of the pool with dig specifications), the installer will mark the placement of the pool in your yard. At this point you will need to make final decisions on any deck, patio, or landscape plans.
Step 2
Delivery
A fiberglass pool is delivered on a low loader tilt truck that is specifically designed to transport swimming pool shells. Parrot Bay Pools are delivered from Kentucky, Virginia, and Florida! Your pool filtration system, tools, equipment, and fittings are all provided by Parrot Bay Pools. Usually, your pool will arrive on the second day, although it varies from job to job.
Step 3
Excavation
Our Parrot Bay Pools and Spas delivery trucks will arrive towing a skid steer and our excavator. The skid steer will be used to move dirt and gravel, while the excavator will dig the hole then lift and set the pool.
Your pool will have the most accurate excavation possible because our excavator has a built-in GPS for digging. Once the pool's size and depth are determined, the excavator will start to dig. As one crew member digs the hole, the others will begin to set up the pump and filter system. The entire excavation process usually takes one day but may vary from job to job, depending on pool size or unforeseeable weather.
Common Excavation Obstacles
- Overdigging – Sometimes the person excavating will dig too deep. The most obvious solutions—that of placing soil back into the hole to raise the depth—is actually NOT a smart option. If soil is placed back into the hole, it will most likely settle over time causing the pool to shift, which could cause many other problems to occur. The only safe fix is to use gravel to raise the depth back up to the proper height. At Parrot Bay you don’t have to be concerned about overdigging. Our machine digs to exact specifications automatically every time.
- Unstable Soil or Organic Materials – Many times during digging our crew members will notice that the soil is not stable, or that there is organic material buried in the pool’s planned location. To prevent settlement, the soil or organic material must be removed regardless of the extra excavation required.
- Digging too Tight – An excavation hole should be approximately 1 foot larger than the outside of the pool shell and approximately 2 inches deeper than the pool depth. This will leave enough room to place sand or gravel along the sides and under the steps, seats and/or ledges of the pool.
Step 4
Setting the Floor and Leveling the Pool
After excavation is complete, a layer of sand or gravel is placed inside the hole where the pool floor will rest. A laser level determines exactly how much sand or gravel should be used to achieve the correct height of the pool.
During the majority of our pool builds we use our excavator to lift your pool and place it in the hole. Occasionally we have to use a crane, such as when we need to lift a pool over a house, wall, or other structure.
Step 5
Plumbing the Pool and Filter System
The filter is composed of two major components: the pool pump and the filter. The pump circulates the water, while the filter removes the debris and small particles from the water. Filter systems are typically located within thirty to sixty feet from the pool. Most pool owners prefer their filter system near their house somewhere inconspicuous.
Step 6
Backfilling the Pool Shell
Once the pool is placed in the hole and leveled, it is time to start filling the pool with water and backfilling around the outside with sand. The water on the inside and the sand on the outside must be brought up together to equalize the pressure.
Step 7
Coping and Decking
With the pool backfilled and electrical inspections approved, the pool is now ready for coping to be installed around the top of the pool shell. For fiberglass pools, standard concrete coping is common. However, other materials such as pavers, travertine, stones and brick may be used depending on the homeowner’s preference.
Step 8
Pool Fence
Within 30 days of completion a 4ft tall fence is required around the pool. In North Carolina your fence is also required to have a self-closing gate that swings out away from the pool and self-latches. Once the fence is installed the homeowner must contact their county for a final inspection.
What Makes Parrot Bay the Best Pool Builder in Raleigh, NC?
- Rhino Roc construction on every River Fiberglass Pool
- 100% gravel backfill under and around the pool
- Flowable concrete fill to ensure there are no voids under your tanning ledges—no cracks or settling in the ledge in a Parrot Bay Pool!
- All rigid, hard PVC plumbing around your pool—no termite damage for you!
- 2″ plumbing around your pool for better flow and energy efficiency—everyone likes to be efficient
- All Pentair equipment with a 3-year warranty when you purchase in a set of 3, equaling no worries for you because you get the best equipment
- Well points on all pools for dewatering
- 24/7 access to your project through our cloud-based project management system—no wondering how to get us on the phone
- Supported plumbing on every pool—no cracked, leaky pipes or worrying about losing water
- Plenty of sanitation and automation options including salt and UV, meaning less maintenance, and options to control your pool from your phone